Custom filters and country IP address lists
This guide explains the screens, buttons, settings, and workflow for custom filters and custom country IP address lists. A “group” is a custom list combining several countries; a “country list” is a saved list selected as a destination IP condition.
The screenshots currently show the Japanese interface. English screenshots will be added later. The English names used below describe the corresponding controls.
Open the three-line side menu at the top left of the main screen and tap Custom filters or Customize country IP address lists to open Screen 1 or Screen 3. Tap Add or Edit on either list to open its creation/editing screen (Screen 2 or Screen 4). Use the back arrow at the top left or your device’s back action to return. If you have unsaved changes on an editing screen, a confirmation appears before you discard them.
Screen overview
Custom filter list
Manage saved custom rules and the apps assigned to each rule.
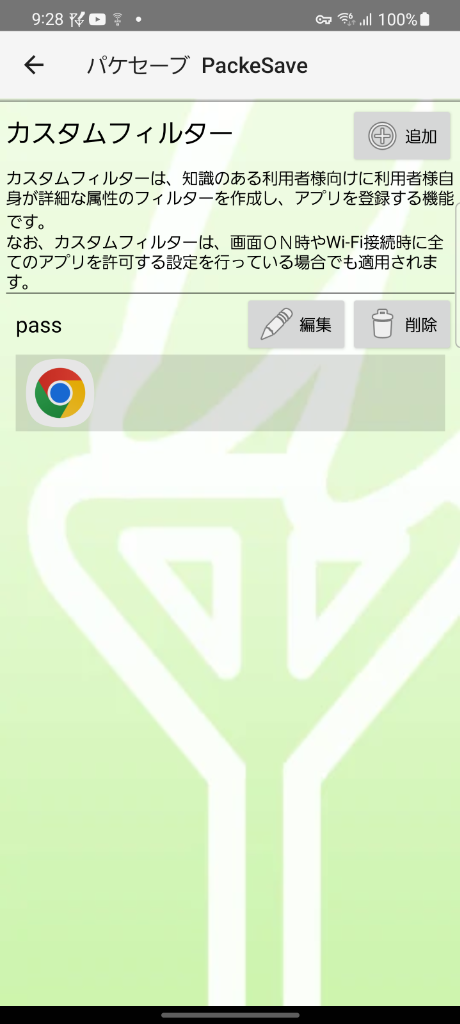
What this screen does
View and manage custom filter names and the icons of apps assigned to them. View or edit each filter’s conditions on Screen 2.
Custom filters still apply even when the general settings allow all apps to communicate while the screen is on or while connected to Wi-Fi. The standard screen-off, screen-on, and Wi-Fi app lists do not appear here. Each custom filter applies only to its assigned apps. Other apps remain subject to the usual settings, including the standard app lists and the Country filter.
Controls and fields
- + Add (top right)
- Opens Screen 2 to create a new custom filter.
- Filter panel (for example, pass)
- Each saved rule is displayed in its own panel under its name, such as pass. Tap Edit on the right to change its conditions, or Delete to remove it after confirmation. Deleting a filter also removes its app assignments.
- App icon area
- Shows the apps assigned to the filter, such as Chrome. Tap this area to open the app list for that filter. Use Add to assign an app and Delete to remove an assignment.
Tap the icon area on Screen 1 to open this list. Use Add at the top to select apps, or Delete in an app’s row to remove its assignment. General switches for allowing all apps while the screen is on or on Wi-Fi are not shown here. In an unlicensed, limited free state, the screen shows how many more apps can be added. Once the limit is reached, it displays a message saying that no more apps can be added.
Create or edit a custom filter
Define the destination IP addresses or countries, connection type, and screen-on/off conditions for an app’s communication. The two screenshots show the upper and lower parts of the same scrollable screen.
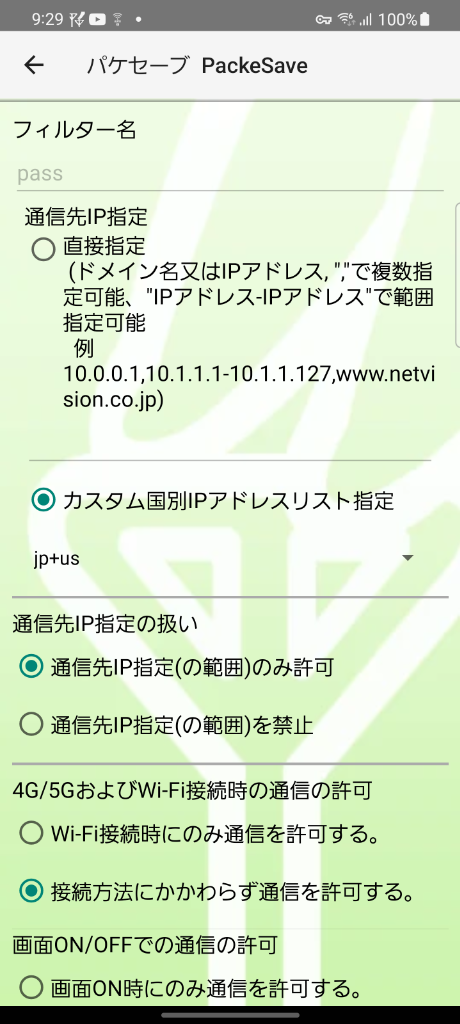
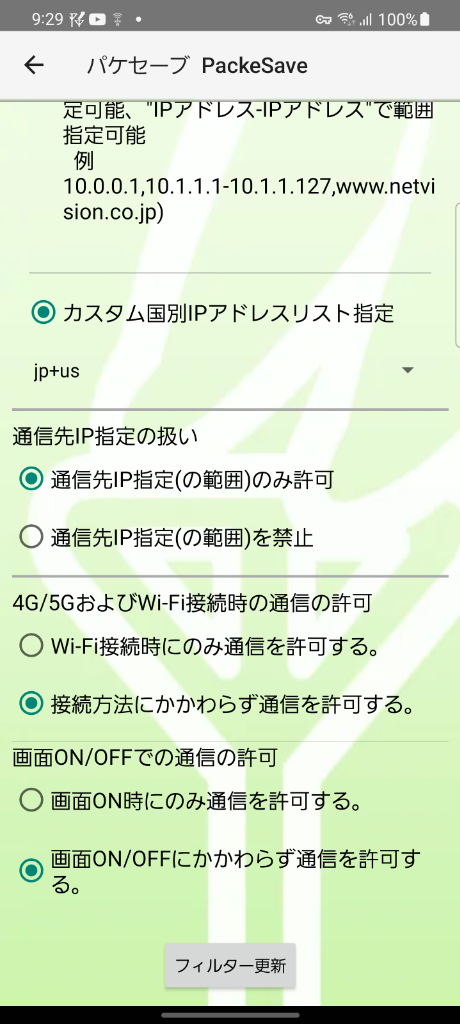
What this screen does
Combine detailed conditions into a rule, such as allowing communication only with specific countries or only over Wi-Fi.
Settings
- Filter name
- Enter a name to identify this rule, such as pass. When editing an existing filter, the name field is disabled and cannot be changed.
- Destination IP specification
- Direct entry: Enter IPv4 addresses or domain names, such as
www.example.com. Separate multiple entries with commas. Use a hyphen for an address range, such as10.1.1.1-10.1.1.127.
Domain names are looked up when you save, with a progress dialog displayed during the lookup. They are converted to IPv4 addresses for traffic matching. Unresolved domain names or invalid IP addresses cause an error.
Custom country IP address list: Select a saved country list, such as jp+us, from the dropdown.
These options are mutually exclusive. Choosing Direct entry disables the dropdown; it is hidden if no country lists exist. Choosing a custom country list disables the IP address input field.Prerequisite: If no country list has been created, the country-list option is disabled and the dropdown is hidden. Direct entry is selected automatically. - How to apply the destination IP specification
- Allow only the specified IP addresses or ranges: An allowlist. Blocks all communication with countries or IP addresses outside the specified set.
Block the specified IP addresses or ranges: A blocklist. Blocks only communication with the specified countries or IP addresses. - Permission on 4G/5G and Wi-Fi
- Choose “Allow communication only when connected to Wi-Fi” to save mobile data, or “Allow communication regardless of connection type.”
- Permission when the screen is on or off
- Choose “Allow communication only when the screen is on” to block background traffic during sleep, or “Allow communication regardless of whether the screen is on or off.”
- Update filter / Add (bottom)
- Validates your input, saves the settings if valid, and returns to Screen 1. An error dialog appears if the name is empty; Direct entry is selected but its IP specification is empty or invalid; a domain name cannot be found; a new filter has a name already in use; or another filter has the same conditions. The custom country-list option is available only after at least one country list has been created.
jp+us. After saving a group on Screen 4, open Screen 2 to select it.Country IP address lists
View and manage custom IP address lists that group several countries together.
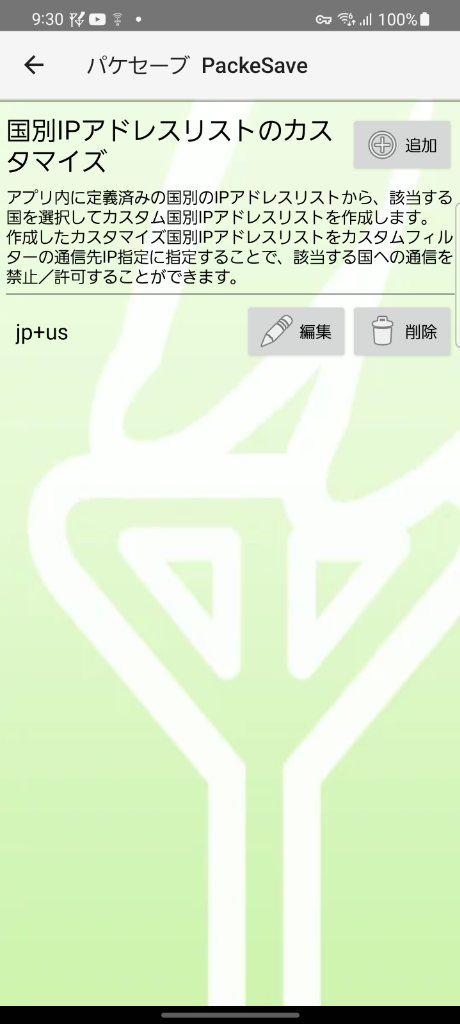
What this screen does
Store and manage country lists, such as a group combining Japan and the United States. If no lists exist, a message indicates that none have been defined. Lists created here become available on the filter settings screen.
Controls and fields
- + Add (top right)
- Opens Screen 4 to create a new combination of countries.
- List row (for example, jp+us)
- Shows the saved list name. Tap Edit on the right to change the countries included, or Delete to remove the list after confirmation. The confirmation message includes the list name.
The main screen’s Country filter is a simplified filter that normally applies to all apps at all times, regardless of other PackeSave settings. For apps assigned to a custom filter, the custom filter’s settings take priority.
You cannot delete a country list that a custom filter currently uses. To prevent inconsistent settings, a message identifies the list and filter and explains that the list is in use. First change the filter to use another destination specification, or delete the filter itself.
Create or edit a country IP address list
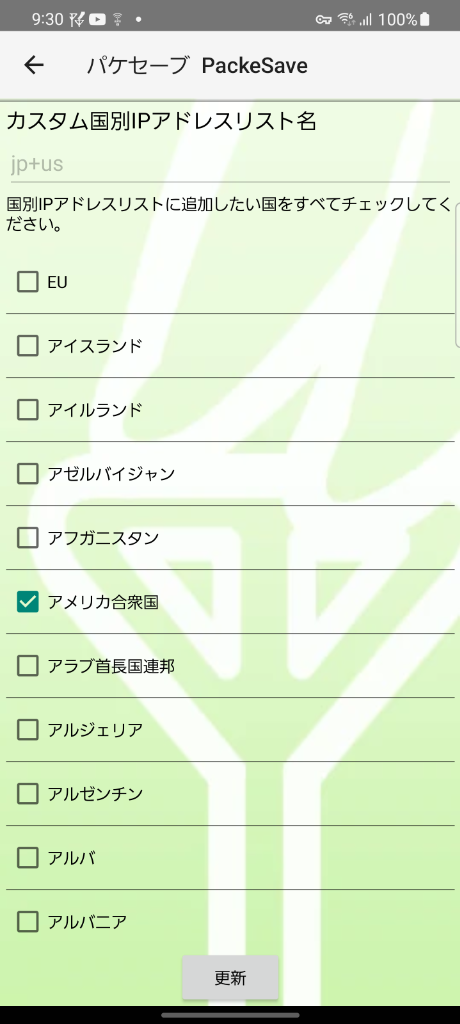
Select countries from the IP address lists available in the app and combine them into a group.
What this screen does
Select one or more countries from the country IP address lists available in the app, give the group a name, and save it as a single list.
Controls and fields
- Custom country IP address list name
- Enter a name for the group, such as jp+us or
Asia. When editing an existing list, the name field is disabled and cannot be changed. - Country selection checkboxes
- Select the countries to include, such as the United States. The list is sorted by display name, with alphabetic codes first, followed by names in the device’s display language. Display names depend on that language; in the Japanese screenshot, EU appears first. You must select at least one country. Available entries are based on the country IP address data stored by the app.
- Update / Add (bottom)
- Saves the selected countries as a group and returns to Screen 3. When creating a new list, an error appears if its name is already in use. This message is shared with filters and says that a filter with the same name is already defined.
Setup workflow
Use these four screens to set up communication restrictions in three steps.
Open Customize country IP address lists from the side menu (Screen 3). Tap Add, select countries on Screen 4, enter a name such as jp+us, and save.
Open Custom filters from the side menu (Screen 1). Tap Add to create a filter such as pass on Screen 2. Select jp+us as the destination list, choose to allow only the specified IP addresses or ranges, and save.
On Screen 1, tap the new filter’s icon area and assign the apps, such as Chrome. Traffic for those apps that falls outside the Japanese and US IP address ranges is then blocked automatically.